In the first part of this series we discussed briefly about Microsoft Azure, Azure Service Bus and elements of Dynamics CRM-Azure integration.
Before going into the details of CRM-Azure integration, I would like to elaborate:
- What we want to achieve in this sample integration (our scenario); and
- What Service Bus feature we will use for the same
In this sample we will integrate Dynamics CRM Online with “Student Management System” that is running on-premises over a local network behind the firewall. We will have a Student ID field on CRM account entity form. If user will provide Student ID while creating a new account, the Dynamics CRM will post the data to the Azure Service Bus and the Service Bus Service hosted on on-premises (but with a Service Bus endpoint located in the cloud) will read the data. The service will then query the database locally and return student’s name and phone number to the Azure Service Bus and the Service Bus will send this information back to the CRM.
You may download the complete sample projects and Dynamics CRM solution at https://github.com/khadimali/DynamicsCrmAzureIntegration.
For this scenario, an Azure Service Bus relay service would be a perfect fit, because:
- Relay service provide two-way communication that queues and topics do not provide.
- Also relay service facilitates direct communication between the applications while queues and topics provide brokered messaging.
Here is how Microsoft Azure documentation article explains Service Bus relay:
The Service Bus relay enables you to host WCF services within your existing enterprise environment. You can then delegate listening for incoming sessions and requests to these WCF services to the Service Bus service running within Azure. This enables you to expose these services to application code running in Azure, or to mobile workers or extranet partner environments. Service Bus enables you to securely control who can access these services at a fine-grained level. It provides a powerful and secure way to expose application functionality and data from your existing enterprise solutions and take advantage of it from the cloud.
Register a Microsoft Azure Subscription
If you don’t have an Azure subscription already, you may register a free trial to play around Microsoft Azure apps and services. To register, you have to provide information about yourself, verification by phone and verification by credit card. Your credit card will not be charged automatically even after the trial expires unless you explicitly authorize the payment.
Creating a Microsoft Azure Service Bus Namespace
Once registered, you have to create a new Service Bus namespace. Normally you can create Service Bus namespace using Azure portal. But in case of integration with Dynamics CRM, you shouldn’t. This is because namespaces created using Azure portal use SAS authentication by default and, to date, Dynamics CRM integrates with Azure Service Bus namespace via ACS authentication only. To create an ACS namespace you have to use Azure PowerShell.
Although, I found this walkthrough in the MSDN that explains configuring Azure with SAS authentication for Dynamics CRM integration using the Plugin Registration Tool from v8.1, but when I downloaded the latest SDK and used the Plugin Registration Tool it turned to me that it still has that old interface as it was in the previous version of the tool that configures service bus ACS namespace, and not an SAS. I had also started a thread regarding this issue at MSDN forums that is still unanswered.
So to create an ACS service bus namespace you need to:
- Install Azure PowerShell from web platform installer
- Start the PowerShell and execute the following command to login to your Azure subscription:
PS C:\ …. > Add-AzureAccount
This will open a dialog to ask your azure subscription credentials.
3. Once authenticated, you can create a new ACS service bus namespace by issuing following command:
PS C:\ …. > New-AzureSBNamespace –Name democrmservicebus -Location “Central US” -CreateACSNamespace $true -NamespaceType Messaging
The namespace must be globally unique. So, you must use a namespace other than one mentioned in this tutorial.
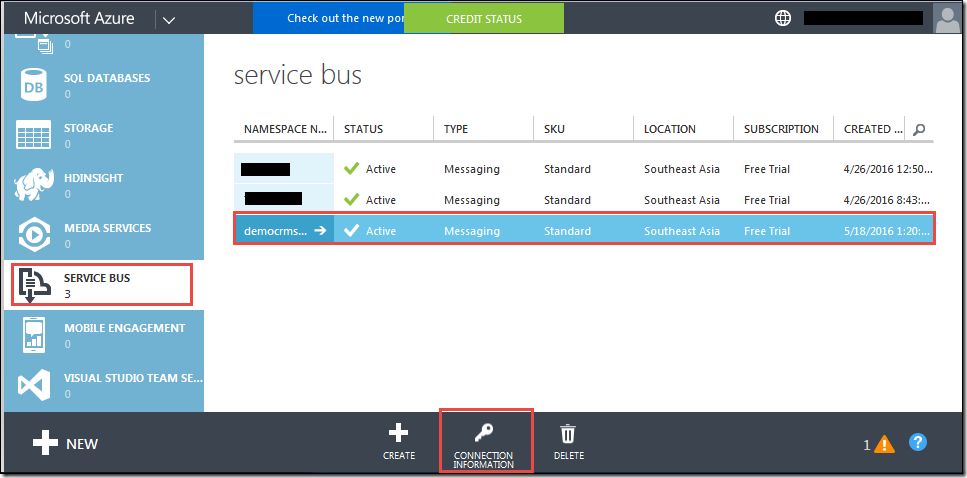
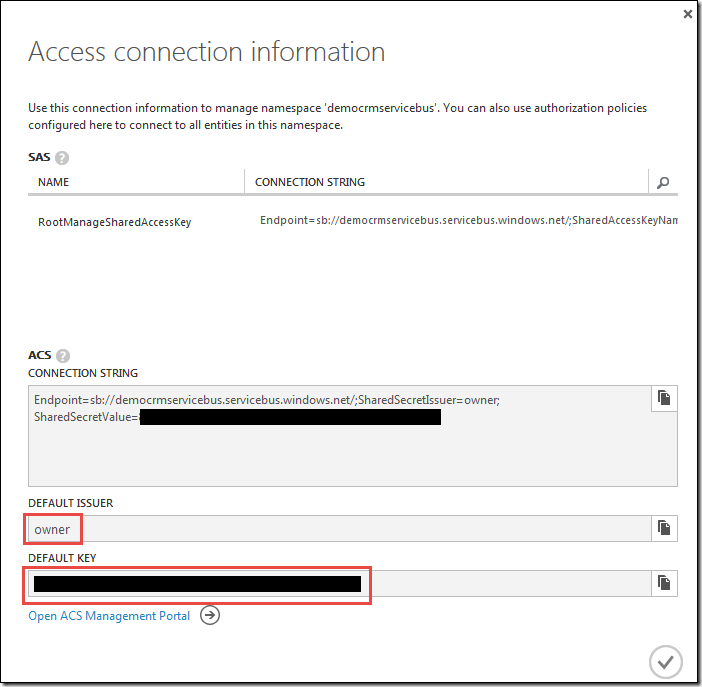
Log in to your Azure portal and select “Service Bus” from left navigation panel. Select the newly created namespace and open the connection information (see images below). Note down the default issuer and default key in the ACS section that you will have to use ahead for CRM-Azure integration.
Get a Public Certificate
Microsoft Dynamics CRM Online users can download a public certificate from within their online instance by visiting the Developer Resources page. To download a certificate:
- Log in to your Dynamics CRM Online instance
- Go to Settings > Customizations > Developer Resources
- Click the “Download Certificate” link in the “Connect this instance of Dynamics CRM to Azure Service Bus” section and save the certificate file on your disk
- Note down the issuer name that is written just above the download link on the same page
Configure Microsoft Dynamics CRM for Azure Integration
Dynamics CRM Online comes pre-configured to work with Microsoft Azure. However, if you are using Dynamics CRM on-premises or IFD deployment, you have to configure the server for Microsoft Azure integration. Refer to Walkthrough: Configure CRM for integration with Microsoft Azure to configure Azure integration for on-premises and IFD deployments.
Configure Azure for Microsoft Dynamics CRM Integration
Next, we have to configure Microsoft Azure Active Directory Access Control Services (ACS):
- the rules and issuers to allow a listener application to read the CRM message posted to the Azure service bus
- the service bus rules to accept the Dynamics CRM issuer claim
Although we can configure these settings in Azure’s ACS portal directly but the recommended way is to use Plugin Registration Tool in the Dynamics CRM SDK.
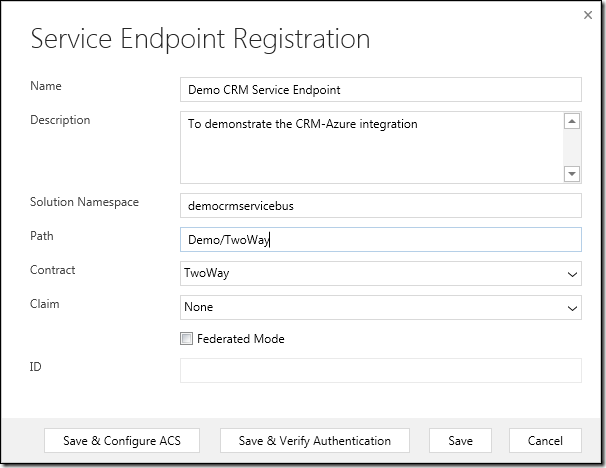
After connecting CRM organization in the Plugin Registration Tool, click on Register > Register New Service Endpoint. A Service Endpoint Registration dialog will appear. Fill the dialog as shown in the below image. (Leave the Claim dropdown to “None” to send standard claim to Microsoft Azure).
| Name | Service Endpoint entity name |
| Description | Something to describe this endpoint |
| Solution Namespace | A Name of the service bus namespace |
| Path | Name of a service bus queue or topic.In case of relays, the path of an endpoint that we will configure as WCF service’s relay endpoint. (More on this ahead) |
| Contract | PersistentQueue Select this if you want to send an execution context to a service bus queue entityTopic To send an execution context to a service bus topic entity. Same as queue except that more than one listener can be subscribed to the topic.OneWay To send an execution context to a Relay endpoint. From there it should be read by an active Azure listener solutionTwoWay Similar to OneWay except that it can receive a string value returned from the listener to the plugin or custom workflow assembly that initiated the post
Rest Similar to TwoWay contract but on a REST endpoint |
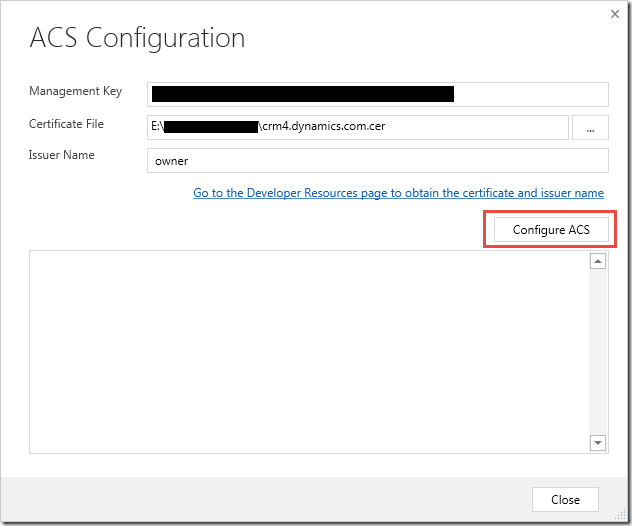
Now follow these steps to configure and verify the Service Bus authentication:
- Click “Save and Configure ACS”. The ACS configuration dialog box will appear.
- Fill in the Management Key with a default key that you have noted down while creating a service bus namespace in this tutorial
- Provide the public certificate file that you have obtained from the Dynamics CRM Online instance
- Fill in the Issuer Name with the issuer name of the certificate
- Click Configure ACS. Configuration process logs would be displayed.
- Click close to return to the Service Endpoint registration dialog
- Click Save and Verify Authentication. A Verifying Authentication progress dialog will appear.
- When success message appear, click close to return back to the Service Endpoint registration dialog
- Click Save. A new Service Endpoint would be saved and appeared in the Plugin Registration Tool.
(For steps 1-6 refer to this image)
Now if we don’t expect or don’t want to receive any string data back from an Azure service bus listener (that we will be coding ahead), we can just create a plugin step right directly inside the Service Endpoint. To do so, you may select the newly created Service Endpoint and click Register > Register New Step (or press Ctrl+T). Then configure the plugin step as usual. But in our example, as we need to pass Student ID and receive back a string data containing Student Name and Phone Number from an on-premises application having student records, we will write a custom Azure-aware plugin in the next section and will register it in the Dynamics CRM.
Write a Custom Azure-aware Plugin
Writing a custom Azure-aware plugin is similar to writing a usual Dynamics CRM plugin except that we have to include a code to initiate the posting of execution context to the Microsoft Azure Service Bus. This will make the CRM plugin an Azure-aware. To implement our scenario I have written a CRM Azure-aware plugin that I will explain here briefly.
You can see in the plugin code below that an AzureAwarePlugin class implements the same IPlugin interface (and an execute method) that any other Dynamics CRM plugin implements. Additionally, it receives an unsecure configuration string in the constructor and set it as serviceEndpointId. Then, if the plugin is invoked by the creation of account it calls the PostAccountContextToAzure() method.
The PostAccountContextToAzure() contains code that actually initiates posting of the execution context to the service bus through the service endpoint notification service (IServiceEndpointNotificationService). It creates an instance of the service endpoint notification service and then calls its Execute() method by providing Service Endpoint entity’s reference and an execution context as parameters. If our Service Endpoint was configured successfully in the Plugin Registration Tool, the Execute() method will post the context to the Service bus relay endpoint (as we had configured the Service Endpoint with a TwoWay (relay) contract). From there it will be read by an active CRM-aware Azure solution (that is a WCF service). We will discuss the Azure solution in the next section.
The Azure service bus will return the student’s name and phone number as a comma separated string. Upon receiving that string of information the plugin breaks the string to extract the two pieces of information and sets the relevant entity attributes – “name” and “telephone1”. The updated student info will be reflected on the account form’s Account Name and Phone attributes. To keep the plugin simple, we have used comma separated string to pass on the information from the service to the CRM. In your professional project you may use JSON’s serialization and deserialization to exchange data.
The full listing of the plugin is below:
using Microsoft.Xrm.Sdk;
using System;

namespace AzureAwareCrmPluginDemo
{
public class AzureAwarePlugin : IPlugin
{
#region Secure/Unsecure Configuration Setup
private string _unsecureConfig = null;
private Guid serviceEndpointId;

public AzureAwarePlugin(string unsecureConfig)
{
_unsecureConfig = unsecureConfig;

if (String.IsNullOrEmpty(_unsecureConfig) || !Guid.TryParse(_unsecureConfig, out serviceEndpointId))
{
throw new InvalidPluginExecutionException("Service endpoint ID should be passed as config.");
}
}
#endregion
public void Execute(IServiceProvider serviceProvider)
{
ITracingService tracer = (ITracingService)serviceProvider.GetService(typeof(ITracingService));
IPluginExecutionContext context = (IPluginExecutionContext)serviceProvider.GetService(typeof(IPluginExecutionContext));
IOrganizationServiceFactory factory = (IOrganizationServiceFactory)serviceProvider.GetService(typeof(IOrganizationServiceFactory));
IOrganizationService service = factory.CreateOrganizationService(context.UserId);

tracer.Trace("Execute > REV: 5");

try
{
Entity entity = (Entity)context.InputParameters["Target"];

//TODO: Do stuff
if (entity.LogicalName == "account" && context.MessageName.ToLower() == "create")
{
int studentId = entity.GetAttributeValue<int>("demo_studentid");

if (studentId > 0)
PostAccountContextToAzure(serviceProvider, tracer, context, entity);
else
tracer.Trace("Execute > account.create > Wont post the context to the Service Bus. Student ID not provided.");
}
}
catch (Exception e)
{
throw new InvalidPluginExecutionException(e.Message);
}
}

private void PostAccountContextToAzure(IServiceProvider serviceProvider, ITracingService tracer, IPluginExecutionContext context, Entity entity)
{
IServiceEndpointNotificationService cloudService = (IServiceEndpointNotificationService)serviceProvider.GetService(typeof(IServiceEndpointNotificationService));
if (cloudService == null)
throw new InvalidPluginExecutionException("Failed to retrieve the service bus service.");

try
{
tracer.Trace("Posting the execution context.");

string response = cloudService.Execute(new EntityReference("serviceendpoint", serviceEndpointId), context);

if (!String.IsNullOrEmpty(response))
{
tracer.Trace("Response = {0}", response);

if (response.StartsWith("false,"))
{
string[] errorInfo = response.Split(',');
string exceptionMessage = null;

if (errorInfo.Length > 1)
exceptionMessage = errorInfo[1];
else
exceptionMessage = "Unknown error.";

throw new InvalidPluginExecutionException(exceptionMessage);
}
else
{
string[] studentInfo = response.Split(',');

if (studentInfo.Length > 0)
{
if (entity.Attributes.Contains("name"))
entity.Attributes["name"] = studentInfo[0];
else
entity.Attributes.Add("name", studentInfo[0]);
}

if (studentInfo.Length > 1)
{
if (entity.Attributes.Contains("telephone1"))
entity.Attributes["telephone1"] = studentInfo[1];
else
entity.Attributes.Add("telephone1", studentInfo[1]);
}
}
}
tracer.Trace("Done.");
}
catch (Exception e)
{
tracer.Trace("Exception: {0}", e.ToString());
throw;
}
}
}
}
Write a Microsoft Azure Listener Solution
Finally, we have to write a listener solution that could listen to and read the CRM execution context from the Azure Service Bus. Azure listener solutions can be of two broad types:
- Queue Listener
- For reading and processing messages from Azure service bus Queues and Topics
- Does not required to be an active listener (senders and receivers do not have to be sending or receiving messages at the same time)
- OneWay, TwoWay or REST Listener
- For reading and processing messages from Azure service bus Relay endpoints
- Must be an active listener
To complete our tutorial we will write and discuss a two-way listener that uses the Windows Communication Foundation (WCF) service with Service Bus extensions to read CRM messages from cloud based Azure Service Bus Relay endpoint. To understand and write a listener for queue, one-way and REST contracts refer to Write a listener application for a Microsoft Azure solution.
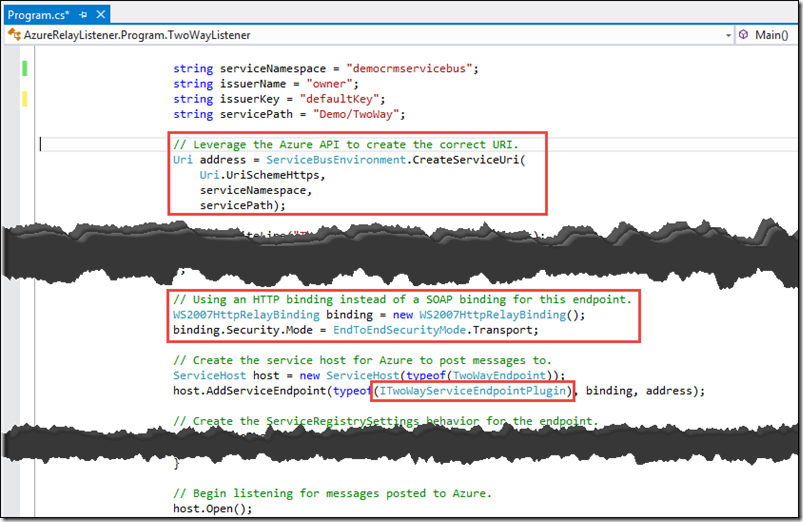
We have two options to connect to the Azure Service Bus: HTTP and TCP. As our custom Azure-aware Dynamics CRM plugin will run in sandbox mode we can only use HTTP to connect to the Azure Service Bus. Next we have to define the WCF endpoint. That endpoint in our example is made up of following ABC (Address, Binding, Contract):
Address – that specifies where the service could be found. In this example the full URI is https://democrmservicebus.servicebus.windows.net/Demo/TwoWay/. We can’t use the ‘sb://’ scheme as it is used for TCP protocols only.
Binding – that specifies how a client can communicate with the endpoint. Our WCF service uses WS2007HttpRelayBinding binding. The main difference between this binding and other WCF bindings is that this binding is not part of the .NET framework. It is defined by the Service Bus.
Contract – that specifies what operations (methods) a service supports. ITwoWayServiceEndpointPlugin is a service contract in our example that is applied with a ServiceContractAttribute. Each method within a service contract must have OperationContractAttribute applied to it also. Execute() method in our example is an OperationContract for the WCF Service Bus service. (See in the image below, the ITwoWayServiceEndpointPlugin service contract is provided in Micorosft.Xrm.Sdk.dll).
So the complete ABC of our Service Bus service would look like as shown in the code snapshot below:
Next, using the TransportClientEndpointBehavior we have created a shared secret token provider by providing default issuer name and issuer key from the Azure Service Bus ACS connection information. This behavior object is added to the WCF endpoint behaviors to specify the Service Bus credentials.
We have created a ServiceHost object passing in the type of TwoWayEndpoint class that implements Execute() method. The Execute() is an operation contract of a service. So, whenever the CRM execution context would be posted to Service Bus using this operation contract, the active Service Bus service will start reading that context and the TwoWayEndpoint.Execute(…) method will be invoked on the service. In our example, the Execute() method will call the GetStudentInfo() method that will query the SQL Server database “TestDb” to get student’s name and phone number. The Execute() method will then return the student information as a comma separated string to the CRM Azure-aware plugin. The Service Bus facilitates this communication between the CRM Online and a locally hosted WCF service with a cloud endpoint.
The full code listing for a WCF Service Bus Service is below:
using System;
using System.Collections.Generic;
using System.Text;

// This namespace is found in the Microsoft.Xrm.Sdk.dll assembly
// found in the SDK\bin folder.
using Microsoft.Xrm.Sdk;

// This namespace is found in Microsoft.ServiceBus.dll assembly
// found in the Windows Azure SDK
// Assembly can be found in C:\Program Files\Microsoft SDKs\Azure\.NET SDK\v2.6\ToolsRef if the SDK has been installed via WPI
using Microsoft.ServiceBus;

using System.ServiceModel;
using System.Data.SqlClient;

namespace AzureRelayListener
{
class Program
{
/// <summary>
/// Creates a two-way endpoint listening for messages from the Windows Azure Service
/// Bus.
/// </summary>
public class TwoWayListener
{
/// <summary>
/// Standard Main() method used by most SDK samples.
/// </summary>
static public void Main()
{
try
{
ServiceBusEnvironment.SystemConnectivity.Mode = ConnectivityMode.Http;

string serviceNamespace = "democrmservicebus";
string issuerName = "owner";
string issuerKey = "<Your ACS Default Key Here>";
string servicePath = "Demo/TwoWay";

// Leverage the Azure API to create the correct URI.
Uri address = ServiceBusEnvironment.CreateServiceUri(
Uri.UriSchemeHttps,
serviceNamespace,
servicePath);

Console.WriteLine("The service address is: " + address);

// Using an HTTP binding instead of a SOAP binding for this endpoint.
WS2007HttpRelayBinding binding = new WS2007HttpRelayBinding();
binding.Security.Mode = EndToEndSecurityMode.Transport;

// Create the service host for Azure to post messages to.
ServiceHost host = new ServiceHost(typeof(TwoWayEndpoint));
host.AddServiceEndpoint(typeof(ITwoWayServiceEndpointPlugin), binding, address);

// Create the shared secret credentials object for the endpoint matching the
// Azure access control services issuer
var sharedSecretServiceBusCredential = new TransportClientEndpointBehavior()
{
TokenProvider = TokenProvider.CreateSharedSecretTokenProvider(issuerName, issuerKey)
};

// Add the service bus credentials to all endpoints specified in configuration.
foreach (var endpoint in host.Description.Endpoints)
{
endpoint.Behaviors.Add(sharedSecretServiceBusCredential);
}

// Begin listening for messages posted to Azure.
host.Open();

Console.WriteLine(Environment.NewLine + "Listening for messages from Azure" +
Environment.NewLine + "Press [Enter] to exit");

// Keep the listener open until Enter is pressed.
Console.ReadLine();

Console.Write("Closing the service host...");
host.Close();
Console.WriteLine(" done.");
}
catch (FaultException<ServiceEndpointFault> ex)
{
Console.WriteLine("The application terminated with an error.");
Console.WriteLine("Message: {0}", ex.Detail.Message);
Console.WriteLine("Inner Fault: {0}",
null == ex.InnerException.Message ? "No Inner Fault" : "Has Inner Fault");
}
catch (System.TimeoutException ex)
{
Console.WriteLine("The application terminated with an error.");
Console.WriteLine("Message: {0}", ex.Message);
Console.WriteLine("Stack Trace: {0}", ex.StackTrace);
Console.WriteLine("Inner Fault: {0}",
null == ex.InnerException.Message ? "No Inner Fault" : ex.InnerException.Message);
}
catch (System.Exception ex)
{
Console.WriteLine("The application terminated with an error.");
Console.WriteLine(ex.Message);

// Display the details of the inner exception.
if (ex.InnerException != null)
{
Console.WriteLine(ex.InnerException.Message);

FaultException<ServiceEndpointFault> fe = ex.InnerException
as FaultException<ServiceEndpointFault>;
if (fe != null)
{
Console.WriteLine("Message: {0}", fe.Detail.Message);
Console.WriteLine("Inner Fault: {0}", null == ex.InnerException.Message ? "No Inner Fault" : "Has Inner Fault");
}
}
}

finally
{
Console.WriteLine("Press <Enter> to exit.");
Console.ReadLine();
}
}
}

#region How-To Sample Code

/// <summary>
/// The Execute method is called when a message is posted to the Azure Service
/// Bus.
/// </summary>
[ServiceBehavior]
private class TwoWayEndpoint : ITwoWayServiceEndpointPlugin
{
#region ITwoWayServiceEndpointPlugin Member

/// <summary>
/// This method is called when a message is posted to the Azure Service Bus.
/// </summary>
/// <param name="context">Data for the request.</param>
/// <returns>A string of information to be returned to the CRM Online Azure-aware plugin.</returns>
public string Execute(RemoteExecutionContext context)
{
string studentId = null;
string returnString = null;

if (context.InputParameters.Contains("Target") && context.InputParameters["Target"] is Entity)
{
var entity = context.InputParameters["Target"] as Entity;
if (entity.Attributes.Contains("demo_studentid"))
{
studentId = entity.Attributes["demo_studentid"].ToString();
}
}

if (studentId != null)
{
returnString = GetStudentInfo(studentId);
}
else
{
returnString = "false,Student ID not provided.";
}

return returnString;
}

#endregion

/// <summary>
/// This method will extract student information from the LOB on-premises application's database directly
/// </summary>
/// <param name="studentId"></param>
/// <returns></returns>
string GetStudentInfo(string studentId)
{
string returnString = null;

SqlConnection connection = new SqlConnection("Data Source=<ServerName>Se;Initial Catalog=TestDb;Integrated Security=True");
using (connection)
{
SqlCommand command = new SqlCommand(
"SELECT Name, PhoneNumber FROM Student where studentid = " + studentId, connection);
connection.Open();

SqlDataReader reader = command.ExecuteReader();

if (reader.HasRows)
{
while (reader.Read())
{
Console.WriteLine("{0}\t{1}", reader.GetString(0),
reader.GetString(1));

var name = reader.GetString(0);
var phone = reader.GetString(1);

returnString = name + "," + phone;
}
}
else
{
Console.WriteLine("Student ID not found in student database.");
returnString = "false,Student ID not found in student database.";
}
reader.Close();
}

return returnString;
}
}

#endregion How-To Sample Code
}
}
To create an Azure listener solution project:
- Create a new console project and name it AzureRelayListener
- Add ‘Microsoft Azure Service Bus’ NuGet package to the project
- Add ‘Microsoft.Xrm.Sdk’ assembly to the project to make in CRM-aware.
- Replace the Program.cs code with the above code.
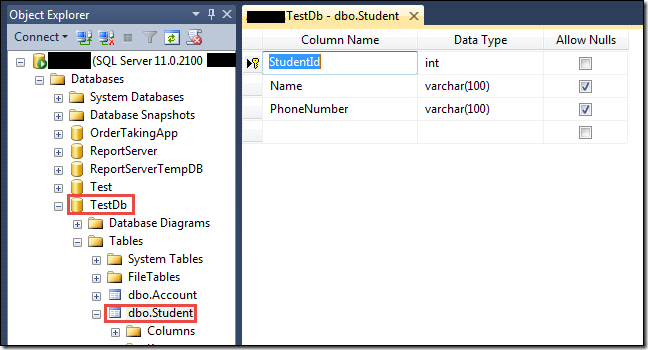
SQL Server database
To make this sample work, we need to have an SQL Server database in place. I have setup the database on my local SQL Server as described below:
- Database ‘TestDb’
- Table ‘Student’
- Fields
- StudentId – int
- Name – varchar(100)
- PhoneNumber – varchar(100)
Customize Dynamics CRM
I have created an unmanaged solution to customize the account entity. It is recommended to do all the customizations in a separate solution even for practice so that you can test deployment of the solution also. Below are the steps required to customize the Dynamics CRM Online instance and to complete our sample:
- Create a new solution and save it.
- Click Entities > Add Existing. ‘Select solution components’ dialog box will appear.
- Select ‘Account’ form of Form Type ‘Main’ from the Forms tab.
- Select ‘Account Name’ field from the fields tab and click Finish to add an account entity to the solution with the minimum required assets.
- Create a new field ‘Student Id’ with Data Type as ‘Whole Number’.
- Change the ‘Field Requirement’ dropdown value of the ‘Account Name’ field to ‘Business Recommended’.
- Drag and drop the ‘Student Id’ field to the account form just above the ‘Account Name’ field.
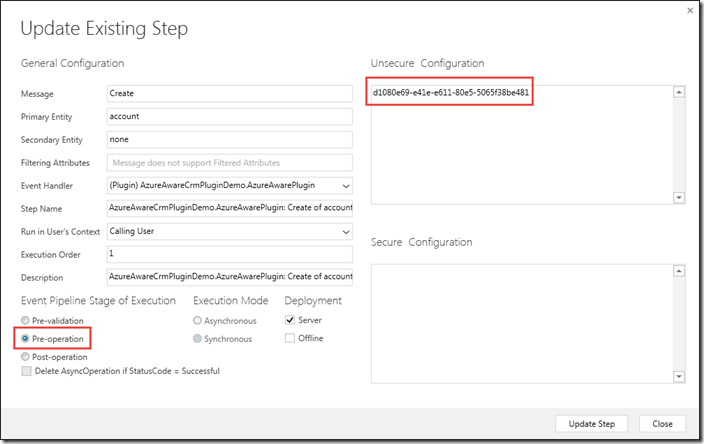
- Register a CRM Azure-aware plugin (that we just discussed above) with a Plugin Registration tool, just like we register other CRM plugins.
- Register new step on the ‘Create’ of ‘account’
- Set ‘Event Pipeline Stage of Execution’ as ‘Pre-operation’
- Put the Service Endpoint ID (that we have configured above) in the ‘Unsecure Configuration’ text box.
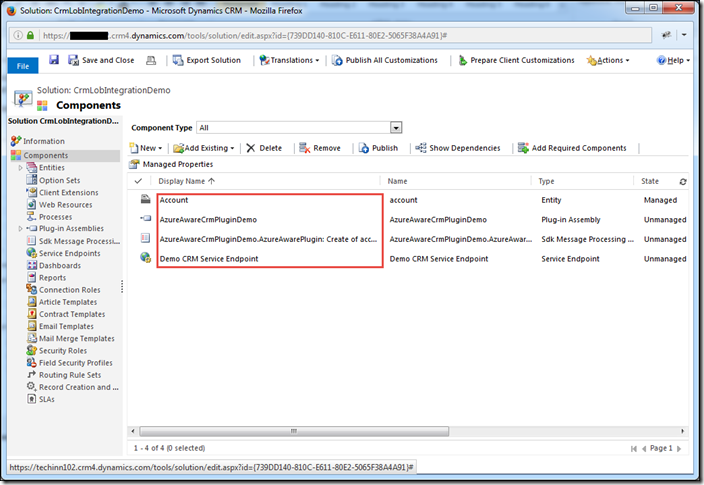
- Go to the solution’s window and Add Service Endpoint, Plugin Assembly and Plugin Step (SDK Message Processing Step) to the solution.
Snapshot of a plugin step for the creation of an account
Snapshot of the solution components for this sample to work
Test the integration
So our CRM-Azure integration is compelted now. To test this:
- Start the CRM-aware Azure solution (WCF console application) so that it can start listening to the relay endpoint
- Go to the Dynamics CRM web application and create new account
- Provide any valid Student ID on the account form (that you have entered in the TestDb.Student table) and save the account record
Dynamics CRM Azure-aware custom plugin will post the data context to the Azure Service Bus relay endpoint, will get the student information back and set it as “Account Name” and “Phone”.
Thank you for reading!

![05.-Service-Contract---Operation-Con[2] 05.-Service-Contract---Operation-Con[2]](https://technologynotesforyou.wordpress.com/wp-content/uploads/2016/05/05-service-contract-operation-con2_thumb.png?w=644&h=471)
Leave a reply to Khadim Ali Cancel reply